Typically when you create an instance of a ColdFusion app using CommandBox , that runs under that user account of the operating system that created it. That works great when you want to run things locally as a developer and you are the only one using your machine, but not so great when you are deploying to a server where multiple users need to access your instance and have it be made visible to everyone.
The way I solve this is to use the Non Sucking Service Manager (NSSM) to register the instance that CommandBox creates as a Windows Service, which is then available to everyone; coupled with all the other benefits that Windows Services offer – like auto starting on OS reboot and what to do when it fails. NSSM is a great tool which interacts with the Windows Service Manager and Brad Wood has a screencast on this module. I took what he shows and created a CommandBox Task Runner which allows me to easily spin up and destroy a Windows Service for each app. All that is needed are three files, an environment file which describes some variables, the actual Task Runner itself written in CFML and wrapped as a CFC to be executed through the CommandBox CLI itself, and the NSSM executable.
The environment file is a typical Java .env file with some variables declared in it:
The variables:
- APPNAME: the name of our app.
- ENVIRONMENT: the name of the environment we are running under, to make it clearer when seeing it in the Windows Services.
- COMMANDBOX_LOCATION: the folder of where the box.exe lives under.
- ROOT_FOLDER: The folder path of our site.
Then I create a component with one function to install and one to remove the Windows Service.
The propertyFile() function used in the code is available through CommandBox, and allows me to load my environment file returning a structure of name-value property pairs. Although I could create a separate user specific for this service (and you may well want to do that for a production system), I usually just use the Windows LocalSystem account.
To run this successfully, you will need both of these files in your website root, together with the nssm.exe file which you can download from the NSSM site.
So, your website root folder should contain these three files along with everything else:
- .env
- nssm.cfc
- nssm.exe
Once that is all set up, I run the CommandBox CLI and from the prompt I cd into the website root folder and run the command
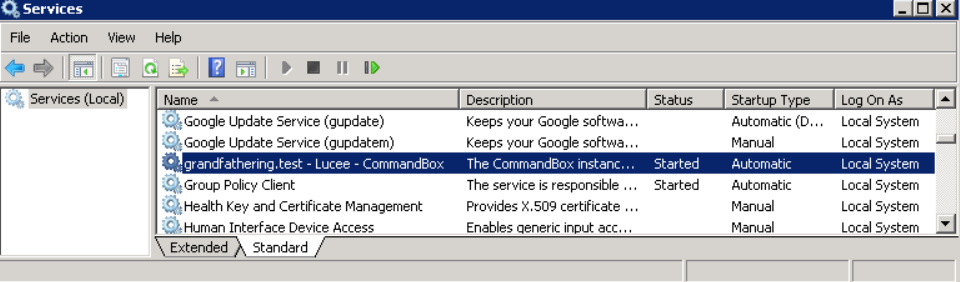
The result is a newly created Windows Service.
Similarly, if I want to remove the service I run this command.
The NSSM module offers a lot of options but the ones I use are all that are needed to get something going. The URL location of your app should be defined in your server.json file under the web.host property, so just open up your browser and navigate to it. Your application is now up and running and available to everyone on your server.
You are the missing link I’ve been searching for in regards to getting NSSM to install my commandBox as a service! Thank you so much for sharing!! I watched the screencast Brad puttogether but something just wasn’t connecting correctly. Your script was the icing on the cake following these two resources:
1) https://acoderslife.com/posts/default/id/Setting-up-Commandbox-Lucee-on-Windows-behind-an-IIS-proxy.htm (blog)
2) https://www.youtube.com/watch?v=8q7sSZ7gK3E&t=302s (Screencast – Running CommandBox Servers Behind IIS)
Hi Tom. This took me a while to figure out, so I am glad it was useful. You might already be aware of it, but Ortus have created a module around this functionality if you are interested in ease of mind and don’t mind spending a few bucks for it: https://www.ortussolutions.com/products/commandbox-service-manager.