Remembering color codes is not the easiest task, even for veteran web developers. In this article we’ll see how to use a custom tag which allows you to easily select a web safe color. In the process, we’ll also take a look at how easy Coldfusion makes it for us to create a custom tag.
First, using the custom tag
The custom tag which does all the work is a file named “color_picker.cfm“, and can be found in the downloadable materials for this article. Place the file inside your custom tags directory or under the same folder as the file that you are going to call it from. First, you call the custom tag from your source code:
This creates an input box with links to select and clear a color:

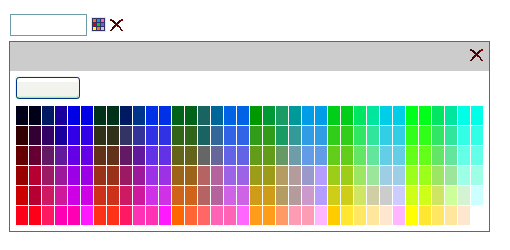
Clicking on the color selector next to the input box displays a DIV section with all the web-safe colors for you to choose from:

The tag has 2 optional parameters:
| Name | Default | Description |
|---|---|---|
| Name | color | The name and id that will be given to the text input field. It must be unique within your page. |
| ImagesLocation | /images/color_picker/ | The location of the 2 images used in the custom tag. You can either create the default folder on your site and place them there, or define your own. |
Here’s an example of using the attributes above, in a form where more than one color selector is used:
In the example above the images are located in the same folder as the custom tag.
In depth look at creating the custom tag
As any coldfusion custom tag, processing inside the tag is divided in 2 execution modes: start and end. As it usually happens, I used the start mode to verify if the tag was called correctly.
Let’s look at the code above in more detail. First, we verify that we used a closing tag in our source code when calling it:
- Correct: <cf_color_picker />
- Correct: <cf_color_picker></cf_color_picker>
- Incorrect: <cf_color_picker>
Then we check if the attribute Name was used and if it was then it must not be left empty. If any errors were found, we display them and exit the tag. Otherwise we define the 2 attributes (Name and ImagesLocation), together with their default values.
The end mode of the tag takes care of the actual processing and output of the HTML. First, we define our variables that will be used throughout the tag. These include the IDs that will be given to the HTML elements. As these must be unique in your HTML output, make sure you are not using the same ones somewhere else.
Then we need to output the hidden DIV of the color selector and the common Javascript functions that do all the work. Since we want to output this content only once, we create a request scope variable (ColorPickerOutput), and set it to true once we do our output. This will ensure that if we use the same custom tag again in the same page, this output will be created only once. Finally, we output the input box with the links to select and clear a color.
The actual color selector DIV and Javascript functions are written by the function “_OutputColorPicker“. I don’t think there is any need to go through it here, you can see it yourselves from the downloads. It’s a simple HTML table content with all the colors, with some Javascript that captures the click event in each cell to return the value back to the input box.
Feel free to use this tag to your liking. If you think of any improvements to it let me know and I will try to add them to it. Use the available forum for this article to make your requests. If you do them yourself then post them on the forum for this article for all to see.
hi, this is great and thanks for sharing. i wonder if its possible to create this without use any JS?
thank you again
zac
Since I wrote this, many a framework has come out including Bootstrap. Although you may use less custom code by implementing one of those frameworks as the foundation when you are trying to create something like this, I am not sure you could get rid of JavaScript completely.
Even if you put the color table inside a window popup and then simply return the selected option back into a form field, you would still need some JavaScript to accomplish that, right?